Capturing a Patient’s Visit involves entering Patient Complaints, Clinical Findings, Vital Parameters, Lab Investigations, Prescriptions, Advice and so on. This tutorial will help you understand entering these details.
- You will see the Visit Entry view after adding a new patient or by double clicking the matching patient based on your search.
- Based on your Patient Treatment View selection done in Application settings, you would either see the Basic/Intermediate/Advanced View.
- Below we show the advanced view to explain maximum entries possible in MyOPD.
- However, not everything must be entered here, you can just enter the visit charges, that too 0 and proceed with saving the visit.
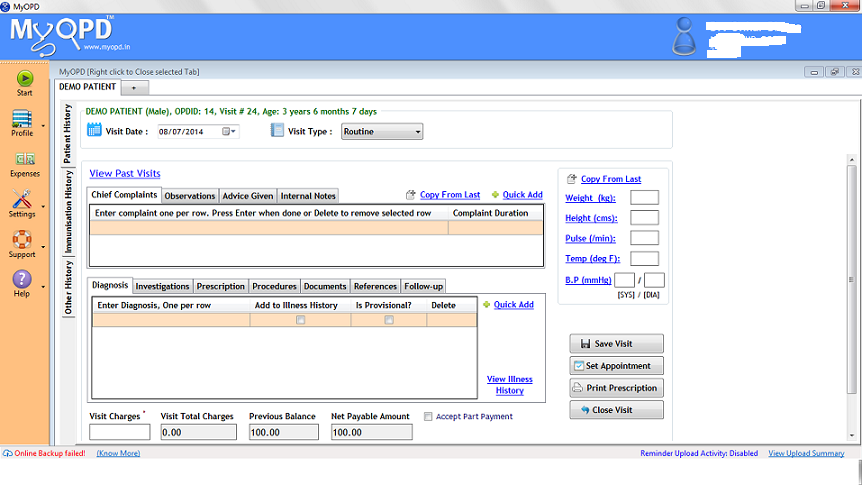
- You can add your typical Chief Complaints, Observations and Advice Given to Demo Patient. It is a dummy patient anyway. This way, once you start entering details for a real patient, MyOPD would start giving matching items in the list. You can also use Quick Add to avoid typing altogether.
- Entering Diagnosis: There are more than 32000 Diagnosis loaded in the Software. However, if you do not find yours, type it. MyOPD would automatically save it for the next time. You can use Quick Add in Diagnosis to quickly find your own custom Diagnosis in the Software.
- Entering Investigations: There are 1200+ Investigations loaded in MyOPD. However, if you do not find yours, type it once. MyOPD would automatically save it for the next time. In Investigation, use the Notes Column if the patient is coming to you with a pre-done Investigation that some other Doctor recommended. If you write notes, the Investigation would not be printed. For an investigation that you have recommended, you can enter finding in subsequent visit by going to View Past Visit -> View Details -> Investigations -> Edit.
- Refer the Entering Prescriptions Guide to view how to enter Prescriptions. It is explained properly there in detail.
- Accepting Payments: Enter Visit Charges. Check Previous Balance. Patient will be paying the “Net Payable Amount”. If Patient does not have full Amount to pay, click Accept Part Payment. You will be prompted to enter the “Current Payment” on clicking Save Visit. Enter the amount the patient has right now. The rest will be kept as balance amount. You can see reports to find the outstanding amount in your clinic.
- Saving the Visit: Click the Save Visit button. Once the visit is saved, you cannot make any changes to the visit.
- Click the Close Visit button to go back to the previous screen and search for a new patient or add a new patient and enter a new visit.
Here is a YouTube video giving idea about how to start Patient’s case taking in MyOPD Clinic Management Software.
Please Note: MyOPD Software is regularly updated. So the article screens and video screen may differ slightly than the version you have. However, you will still get a good idea about the functionality.
Published by MyOPD, Clinic Management Software for Doctors (www.myopd.in)


